- Joined
- Apr 10, 2025
- Messages
- 28
- Thread Author
- #1
Setup Guide: AltaLabs Route10 on Olilo
Unbox & Cabling
Plug the ONT Ethernet cable into either WAN1 or WAN2 (if you have a SFP module) on the Route10.
Select Your WAN Port in the Wizard
After powering on and connecting via ethernet, browse to the setup URL.
When prompted, click the button matching the port you used in step 1 (e.g. WAN1).
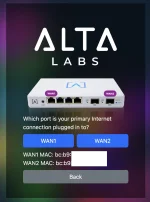
Figure 1: Which port is your primary Internet connection plugged into?
Pick Your Connection Type
PPPoE – For now Olilo requires a username/password to connect to your Network.
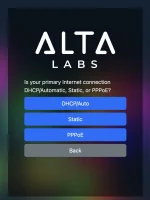
Figure 2: DHCP/Auto vs Static vs PPPoE
Enter Credentials
Fill in the username and password Olilo provided.
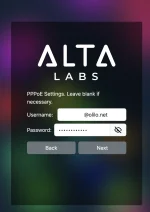
Figure 3: PPPoE settings
VLAN Tagging Check
If you are on the CityFibre network this requires VLAN tagging on the WAN link, so click Yes.
Otherwise, choose No / Don’t know.
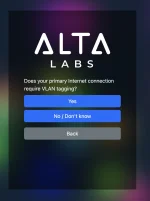
Figure 4: Do you require VLAN tagging?
Enter VLAN & QoS Tags
VLAN Tag: 911.
QoS Tag: leave blank.
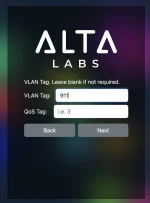
Figure 5: VLAN tag
Force Ethernet Link Speed
Most of the time No / Automatic is fine.
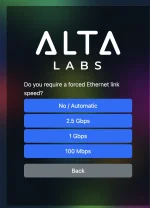
Figure 6: Do you require a forced Ethernet link speed?
Extra VLAN for Controller (Optional)
• Only needed if you want to isolate your management network.
• Default LAN: 192.168.1.1/24 (you can leave it).
• Extra VLAN: pick an ID (e.g. 2) and subnet (e.g. 192.168.2.1/24).
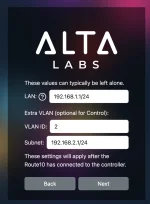
Figure 7: Configuring extra VLAN for controller
Finish & Verify
- Click Next until the wizard completes.
- Check the AltaLabs controller and you should now be able to add the Route10.
- Test internet by browsing or pinging a reliable host (e.g. 8.8.8.8).
That’s it! Your Route10 should now be talking over your network. Enjoy the speedy connection!
Unbox & Cabling
Plug the ONT Ethernet cable into either WAN1 or WAN2 (if you have a SFP module) on the Route10.
Select Your WAN Port in the Wizard
After powering on and connecting via ethernet, browse to the setup URL.
When prompted, click the button matching the port you used in step 1 (e.g. WAN1).

Figure 1: Which port is your primary Internet connection plugged into?
Pick Your Connection Type
PPPoE – For now Olilo requires a username/password to connect to your Network.

Figure 2: DHCP/Auto vs Static vs PPPoE
Enter Credentials
Fill in the username and password Olilo provided.

Figure 3: PPPoE settings
VLAN Tagging Check
If you are on the CityFibre network this requires VLAN tagging on the WAN link, so click Yes.
Otherwise, choose No / Don’t know.

Figure 4: Do you require VLAN tagging?
Enter VLAN & QoS Tags
VLAN Tag: 911.
QoS Tag: leave blank.

Figure 5: VLAN tag
Force Ethernet Link Speed
Most of the time No / Automatic is fine.

Figure 6: Do you require a forced Ethernet link speed?
Extra VLAN for Controller (Optional)
• Only needed if you want to isolate your management network.
• Default LAN: 192.168.1.1/24 (you can leave it).
• Extra VLAN: pick an ID (e.g. 2) and subnet (e.g. 192.168.2.1/24).

Figure 7: Configuring extra VLAN for controller
Finish & Verify
- Click Next until the wizard completes.
- Check the AltaLabs controller and you should now be able to add the Route10.
- Test internet by browsing or pinging a reliable host (e.g. 8.8.8.8).
That’s it!
